|
WHO TRACKS WHAT |
Under Settings > Tracking > Who tracks what, it is possible to define which user tracks which vehicles / trailers / drivers / Company POIs / assets.
Note that the available tab pages in this screen depend on the configured user rights. Consult Settings > Rights profiles for more information.
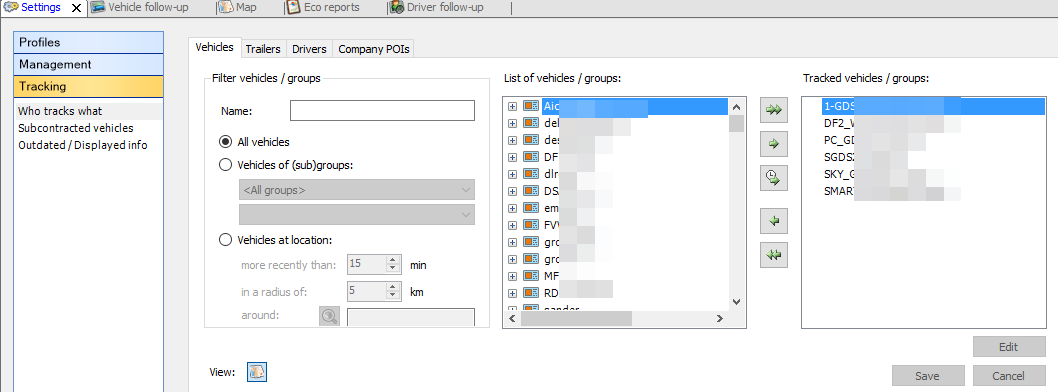
The "Who tracks what" screen is divided into two zones:
· The upper zone contains the "Filter users" area, where you can filter all users on their code / user ID, last name or first name.
· The lower zone contains the details, showing which vehicles, trailers, drivers, company POIs or assets the selected user follows up.
Each of the four tab pages in the lower zone contains a filter, allowing you to enter a specific name or select a (sub)group.
The (sub)groups of vehicles, trailers, drivers, company POIs and assets (including their icons) can be managed under Settings > Management > Groups.
|
VISUALIZATION |
![]()
|
|
Groups: Vehicle groups with their subgroups. |
|
|
Subgroups: Vehicle subgroups (hoover over the subgroup to see the vehicles in this subgroup). |
|
|
Vehicles: All vehicles are shown separately, even if they belong to a (sub)group. In this way, the dispatcher can select individual vehicles. |
In this example, the vehicles are grouped per country. The dispatcher needs to follow up the trucks in Finland. Both in the list of vehicles and tracked vehicles, you can hover over the selected country to see which vehicles belong to this subgroup. This also applies to the other tab pages.
![]()
(Only TX-SKY - not active by default)
As from TX-CONNECT version 11.45.14, additional user rights are available that allow you to adjust the assigned items (vehicles, trailers, drivers or company POIs) only for the current user profile (cf. Settings > Rights profiles).
When active, you can modify the tracked vehicles, trailers, drivers or company POIs in the "Who tracks what" screen only for your own user (not for other users).
Each of the four tab pages contains a filter, allowing you to enter a specific name or select a (sub)group.
The (sub)groups of vehicles, trailers, drivers and company POIs can be managed under Settings > Management > Groups.
At the bottom of the screen, click on  to display the map view.
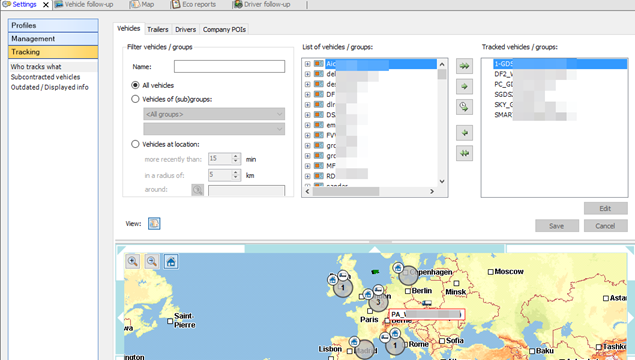
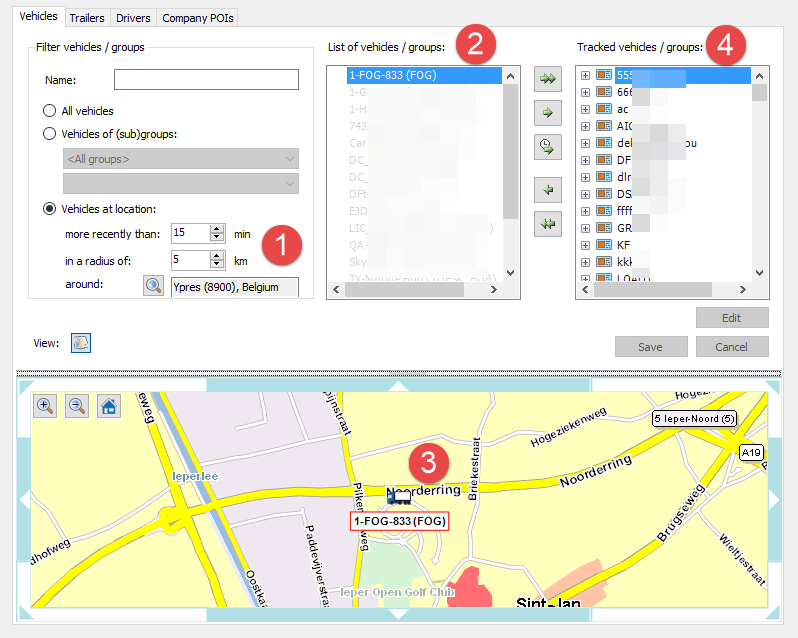
You can now use the "Vehicles / Trailers at location" filter (depending on the tab page you are in) to filter the list of available items based on their current location.
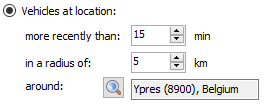 |
Click on  to add a location. to add a location. |
When selected, only the items that meet the configured location requirements (cf. 1) are shown in the list of available vehicles (cf. 2) and on the map (cf. 3).
Use the arrow buttons to add them to your tracked items (cf. 4). Click on Save to save your changes.
As certain companies want to allow lessees or external parties to log in as a user, it is possible to assign vehicles or trailers for a specific period of time. In this way, these external parties or lessees can temporarily track their vehicles.
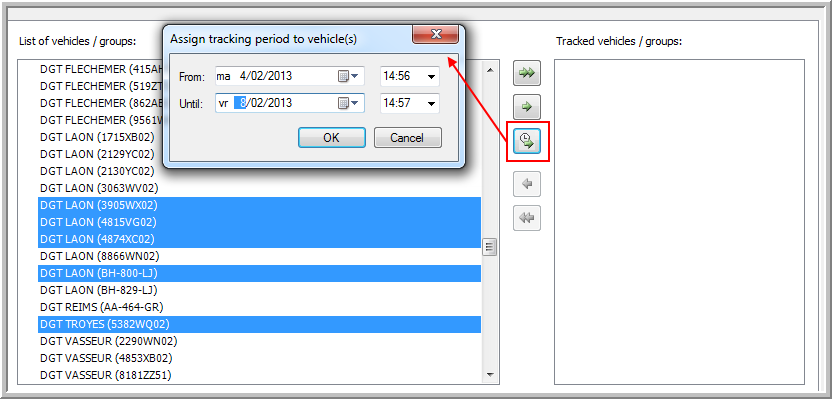
This button ![]() works in exactly the same way as the other buttons, except that you have to define a period for the selected vehicle(s) or trailer(s).
works in exactly the same way as the other buttons, except that you have to define a period for the selected vehicle(s) or trailer(s).
With the Edit button, you can edit the tracking period of the selected vehicle in the tracked vehicle list.
Note:
When you assign a group of vehicles / trailers for a specific period, the items will be shown separately in the tracked vehicles / trailers list.
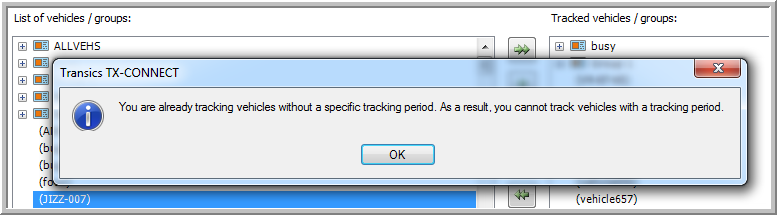
It is not possible to use both options at the same time. If a user already permanently tracks vehicles / trailers, it will not be possible to assign vehicles / trailers for a specific period of time to this user. The other way around will not work either.
Back to Settings - General overview
Related topics: How do I create a driver - How do I create a vehicle - How do I create a trailer - How do I create a user - How do I create a POI


