|
ROUTE CALCULATION |
There are two possibilities to create and calculate a route:
It is possible to create and calculate a route between addresses on the map.
(Find out how to search for an address on the map.)
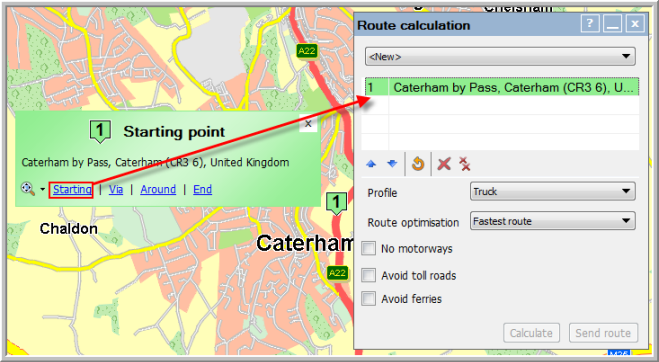
Once you have found an address for your route, you can assign a route point to it. From the moment you click on the Starting button to set this address as the first point of your route, the "Route calculation" window will open. Make sure you set a starting point and an end point to be able to calculate the route.
It is also possible to create a route with the Create route button in the drop-down menu under "Get address":
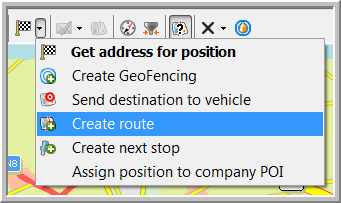
As long as this function is activated, the user can add route points just by clicking on the map. The first point is automatically set as "Starting point", while the last point has to be set by the user as "End point". All points in between can be set as hard or soft via points.
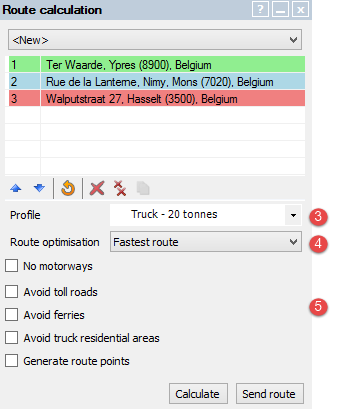
There are four different kinds of route points:
 |
It is also possible to select the ferry or train you want to take, in order to combine several means of transport in the route calculation.
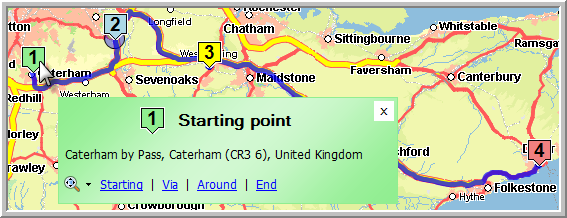
Note: When selecting a route point in the list, it will flash on the map for an easy localization of the point. |
 |
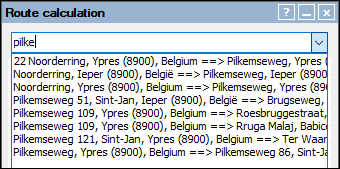
To select a route, type the initial letters of the route. From the filtered names that matching with the typed letters, click on the route.
|
||||||||||||||||||
 |
Note that these settings are saved in the personalized view, NOT in the route itself. As a result, it is possible that the calculated route on the map does not fully correspond to the route in the "Route management" screen. |
||||||||||||||||||
Calculate route |
|||||||||||||||||||
|
|
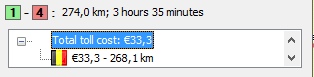
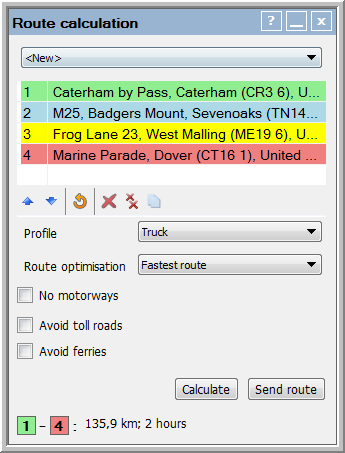
Click on Calculate to calculate the route with the configured route points and settings. The route will be calculated according to the order in which the addresses were entered in the list. In the bottom left corner of the window, the number of kilometers between the starting and end point is shown, as well as the estimated time (based on truck speed) necessary to get from the starting to the end point. If the route goes over the sea, the number of kilometers and the average ferry time are shown. If there are toll costs (vignettes ...) to be paid, these are shown per country in the respective currency. Good to know:
|
||||||||||||||||||
If you have sufficient rights, you can send the calculated route to a vehicle, by clicking on the Send route button and selecting the recipient(s). The following window opens:
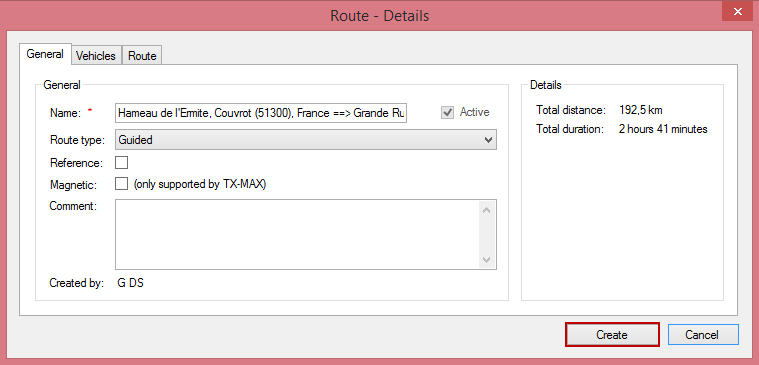
In the "General" tab page, you can:
· Change the name of the route. Deactivating the route is only possible in the "Route management" screen.
· Set the route as a "Monitored" route. This means that the route points must be followed in the right order.
· Set the route as a "Reference" route: The ideal route, for instance as it is was driven by an experienced driver (cf. Filter routes).
· Set the route as a "Magnetic" route: As from TX-CONNECT version 11.23, routes can be set to "Magnetic" (only for TX-MAX devices). A magnetic route will draw the route calculation in the direction of the magnetic route, rather than directing it directly to one of its route points. (Remark: For TX-SKY devices, all route types are magnetic).
In the "Vehicles" tab page, you can add or delete vehicles.
In the "Route" tab page, it is possible to edit the name of the via points by double-clicking on the name.
The button at the bottom of the window changes in function of the route:
|
When creating |
a new route with vehicles |
|
|
|
a new route without vehicles |
|
|
|
||
|
When updating |
a route with vehicles |
|
|
|
a route without vehicles |
|
Related topics: Route management - Convert a historical route - Filter routes - Toll costs - Create your own truck profiles - How do I create a route