
|
Activity report - Table view |
This table contains a detailed information grid of the selection you made in the search area. This part of the Activity report management screen also contains a search field. Furthermore, it is possible to visualize only the untreated information by ticking the checkbox.
|
EDIT DATA |
In some of the columns, it is possible to modify the information. Please note that it is only possible to make changes to "Edited data" and not to "Original data". Click on the information to make your changes, or click on the ![]() icon in a particular column to unfold a drop-down list with possibilities.
icon in a particular column to unfold a drop-down list with possibilities.
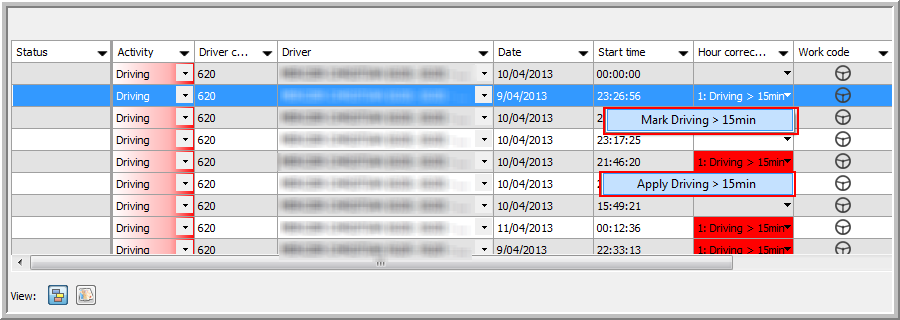
In the Hour Corrections column, you can apply or mark hour corrections, corresponding to the hour corrections you created under Settings > Hour corrections.
TX-CONNECT will automatically detect deviations on the data and will propose you to apply or mark the hour correction.
Note: Hour correction assigned to driver / group: As from TX-CONNECT 11.35, you can assign hour corrections to specific drivers or driver groups (cf. Drivers tab page in Settings > Management > Hour corrections). As a result, only the hour corrections assigned to the selected drivers / groups are taken into account.
When looking at an hour correction in the Hour correction details window (in the Activity management > All hour corrections module), you will get a message, redirecting you to this table. If the not allowed time cannot be automatically converted, it has to be manually converted into another activity in "Activity report management".
In the Treated column, you can tick the checkbox to set a line to "Treated". Your name will automatically appear in the Treated by column. You can undo the treatment by checking off the checkbox. Please note that you can also undo the treatment of lines that were set to "Treated" by other users and vice versa.
If you right-click on one of the rows, you see the following options:
|
Edit |
When clicking on Edit, the Details window will open, allowing you to edit data. Note: you can also modify the information by clicking on the |
|
Split |
When clicking on Split, the Split activity window will open, allowing you to modify the details of the activity you want to split. |
|
Delete |
Delete an activity. |
|
Insert |
It is possible to insert a new activity before or after an existing activity. |
|
Set to "Treated" |
Set one or multiple activities to "Treated". |
|
Export all data |
Create an Excel report of all data. |
|
Export selected data |
It is possible to select multiple rows at once by holding the Ctrl button. Click here for a general example of a data export. |
Note: Select multiple rows you want to modify by holding the Ctrl or Shift button:

The first column of the table (the Status column) contains status indicators which convey a certain message for the information line. These are the possible indicators:
|
|
Unsaved information |
|
|
Day codes |
|
|
Corrected information |
|
|
Remarks |
|
|
Click on the Save button to save the changes you made to the information. Your user name will automatically appear in the Modified by column.
|
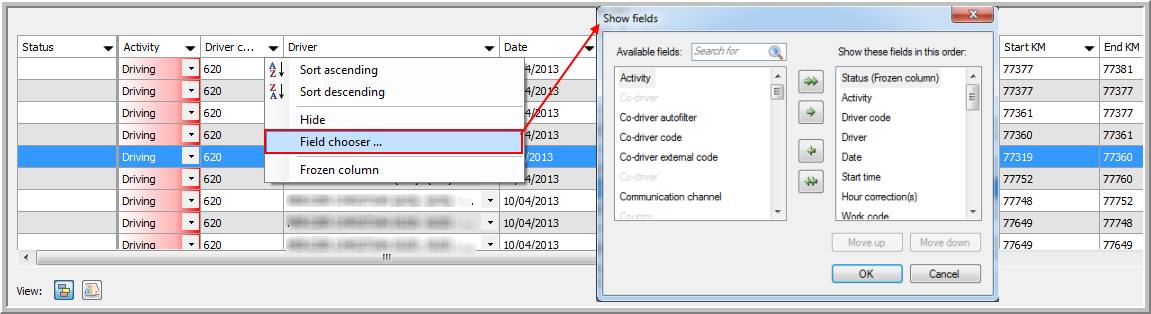
VISUALIZATION |
Go to the Field chooser to choose which information needs to be displayed and how you want it to be displayed:
In order to easily modify the order number in the activity report, the AutoEdit function was added in TX-CONNECT V11.
Note: The AutoEdit function is inactive by default.
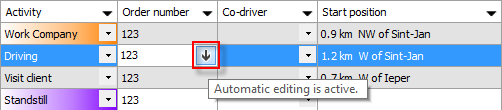
● AutoEdit active
Activate the AutoEdit function by clicking the toggle button in the Order number field. When active, the AutoEdit function will copy your adjustment to all adjacent rows with the same order number.
Example: If a dispatcher wants to modify the order number for all rows below the selected row, he selects the Order number field in the selected row and activates the AutoEdit function by clicking on the toggle button.
The dispatcher can now modify the order number from "123" to e.g. "1234". Select a different field in the table (or press the Enter or arrow down key) to apply the change.
The order number will now be modified to "1234" for all adjacent rows below the selected row.

● AutoEdit inactive
Turn off the AutoEdit function by clicking on the toggle button in the Order number field. The icon will be greyed out.

If the dispatcher now modifies the order number in the selected row, the change will only be applied to the selected row.
Related topics: How do I create an hour correction - Question Path Info