|
PLANNING OVERVIEW |
This screen gives you an overview of all planning items of the vehicles you follow up.
The upper part of the screen contains a collapsible Advanced filter, where you can filter on trip status and name. Note that the status filter only applies to the parent level (trip or place level).
The lower part of the screen contains a data grid with all the planning information.
The data are automatically refreshed every 2 minutes. However, the automatic refresh can be switched off in consultation with the project engineers and the customer. In this case, you can use the Refresh button every 5 minutes. Note: If the hour next to "Latest refresh" changes every 2 minutes, your data is automatically refreshed. If not, you will have to refresh your data manually.
In the bottom right corner, the Create new trip button is provided.
|
VISUALISATION |
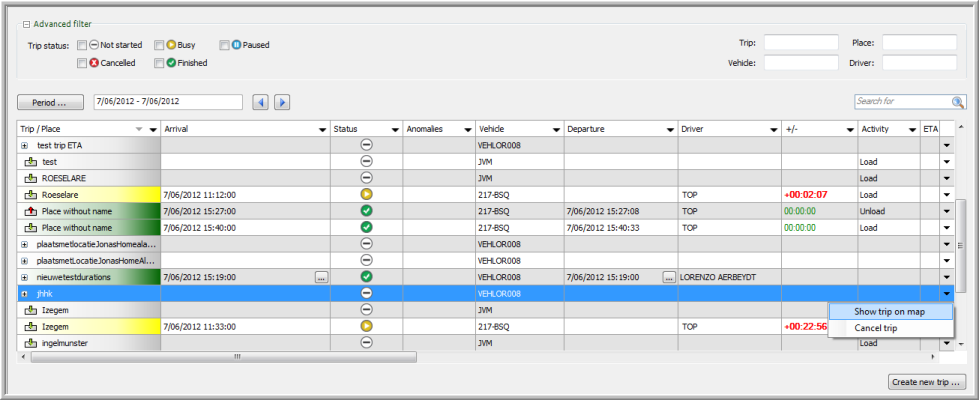
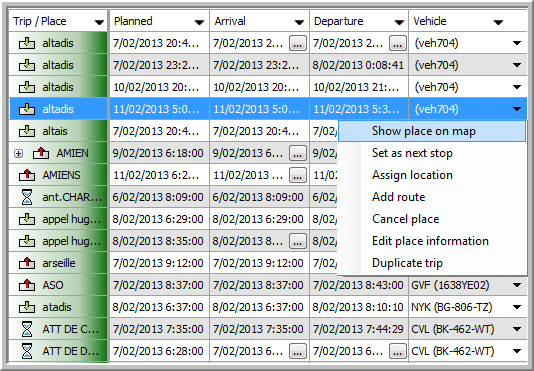
The Trip / Place column provides a hierarchical tree view of every planning item. In this hierarchical view, the planning items are shown in the colour that corresponds to their status. Furthermore, the place activities are visualised by an icon. These icons can be managed under Settings > Management > Activities / Registrations.
In the drop-down list in the right part of the screen, several options are available. Depending on whether a trip, a place or a product is selected, the following options are available:
|
Options on trip level |
|
|
Show trip on map |
The Map module opens and gives you the following information:
Furthermore, it is possible to convert or export the route. |
|
Cancel trip |
The trip will be cancelled. Please note that you will not be asked to confirm. |
|
Edit trip information |
Edit the sales price of the trip. |
|
Duplicate trip |
Make a duplicate of the trip. Remark: If the planned time of the place is in the future, it will be copied. If it is in the past, the planned time will not be copied. |
|
Options on place level |
|
|
Show place on map |
The Map module opens and shows the place with extra information in the tooltip.
|
|
Set as next stop |
The Next stop screen opens. Set the selected place as a next stop for the selected or other vehicles. |
|
Assign location |
Assign a specific location to the selected place. This can be an address or a POI that is followed by the user. |
|
Add route |
Add a route to the place. Click here for more info. |
|
Cancel place |
The place will be cancelled. Please note that you will not be asked to confirm. |
|
Edit place information |
Here you get the possibility to edit the:
|
|
Options on product level |
|
|
Cancel product |
The product will be cancelled. Please note that you will not be asked to confirm. |
The Status column shows the status of every item. There are 5 possibilities:
|
|
|
|
|
|
|
|
|
|
In the Departure, Arrival, Anomalies, Pallet info and Extra info columns, you can find the  icon. When clicking on this icon, you get extra information.
For the Departure and Arrival columns, this "Consultation info" window contains start and stop information on the completed trip.
For the Anomalies, Pallet info and Extra info columns, the window contains information that was added by the driver on his on-board computer.


